Xpress Search Results Fields and Controls
After Running an Xpress Search, results display with a variety of search manipulation and order options. These are described in the table below.
Field/Control |
Description |
|
Clicking this feature hides or displays the Search Parameters/Recent Activity panel. |
Result Toolbar |
The Results Toolbar contains buttons to provide quick access to specific functions. For some functions, you must first click a checkbox(es) in results, then choose a function. |
Add Search allows you to quickly add a search to the existing order. Clicking Add Search displays the property search page pre-filled with the existing order number, company, department, title unit, state, and county so you can quickly run a new property search and simultaneously add it to the order. Also see Adding a New Search to an Existing Order from Search Results for further information. |
|
Clicking Print prints post-filtered and sorted search results (as displayed on-screen), and not associated images. Clicking
|
|
Clicking Email allows you to e-mail your results and images using your local e-mail client. See E-Mailing Results and Images from Search Results for details. |
|
Clicking Save allows you to save your results and images to your local drive or network location. See Saving Results and Images from Search Results for details. |
|
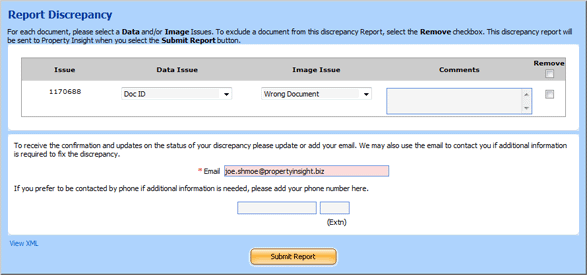
Clicking Report Discrepancy displays the Discrepancy Report FormDiscrepancy Report Form for you to report document and posting errors.
|
|
Property Information |
|
Clicking Copy Text copies the text to your operating system's Clipboard so you can paste it into another document. |
|
Ownership History |
Ownership History displays a list of deeds. The list of deeds goes back as far as data is available for a specific county. |
A number assigned to a particular instrument. Clicking this number displays the document's image in a separate QuickView window. |
|
Keep existing names and/or type one or more additional names to search in the name portion of the screen (also see Entering Business or Individual Names for Name Search). |
|
Choose Match for each name to indicate the level of accuracy for finding and identifying instruments when searching by name. |
|
Choose Run Alternate Combinations to search all of the possible permutations of a name. |
|
Choose Include Nicknames to search first name nicknames (such as Katie and Kate for Katherine). |
|
Optionally type a From date to limit Name Search from the date typed. A From Date pre-populates based on the Years Back Default you typed in Searches Preferences for Name Search. You must type the date format as mm/dd/yyyy. |
|
Choose Hide Released Documents to hide all documents (and all related reference documents) that are coupled with a release and/or satisfaction. You can undo these filters in Xpress Name Search Results. |
|
Click Begin Search to start the search. If you:
|